Drolo Molecular Disruptor V3 - Killer Glitch/Multi-FX Pedal : Overview with some Key Patches, Settings and Notes
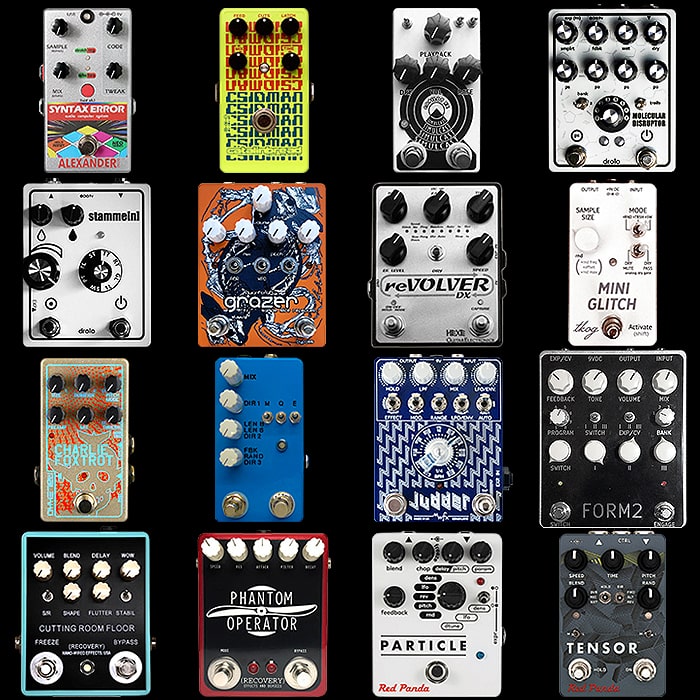
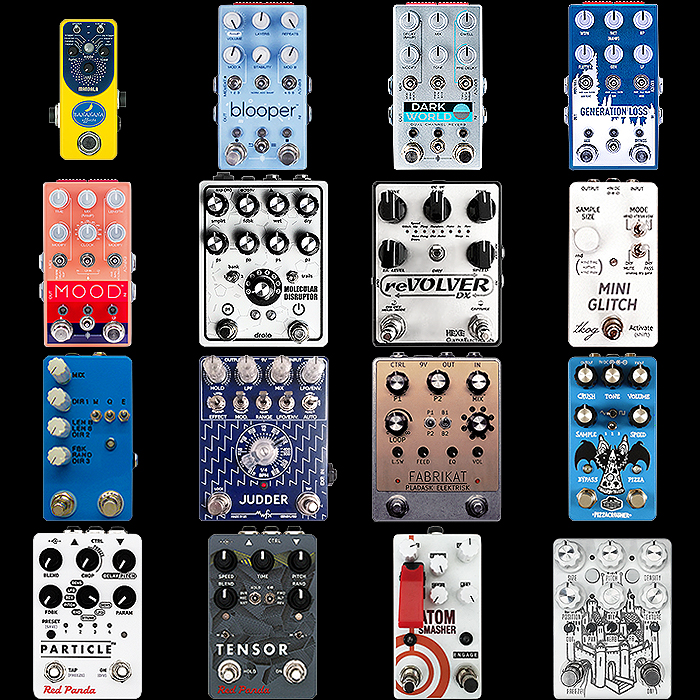
So some of you know that I declared 2019 would be my ’Year of Glitch’ following on from last year’s ’Year of Fuzz’. I had a longlist of 16 of the Best Glitch Effects Pedals - and indicated which of those were my preferred options. I very soon had 4 of those pedals in my collection - in order of arrival - King of Gear Mini Glitch, Montreal Assembly Count to Five, Drolo Molecular Disruptor V3, and the gold-face Pladask Elektrisk Fabrikat. There are a few missing off the list like the Cooper FX Moment Machine, and there is also my next likely target - Tomkat’s brand new Cloudy pedal which I missed in its first limited batch at the start of this month.
The Mini Glitch and CT5 are relatively straight forward to use - particularly the former, while I knew that the 16 patches on each of the Disruptor and Fabrikat would take me longer to get my head around. In fact the Disruptor arrived sort of mid-January, and I’ve been playing with it since - trying to get a full and proper understanding of it, as well as bring forth the very best of what it has to offer. Each of these pedals falls within the Granular Synthesis camp - which I also refer to as Micro-Sampler/Looper - and which covers a variety of effects including various granular delays, pitch shifting and other more traditional modulations.
I will get right into proceedings by obviously stating that the Molecular Disruptor is most definitely one for us dial-tweakers - and those willing to spend some significant time to get the perfect results. By its nature of many dials and switches it could never be construed as a simple pedal, and while superficially it appears relatively straight forward, using this pedal fully is usually more complicated than it looks as each key dial has such a variety of changing functions and a lot of the sweetspots occupy such small ranges on each of those dials that you frequently need to precisely fine-tune and calibrate each patch by ear - which does not really allow the pedal to be used in active or live playback against multiple patches - each of which will have very different settings on the dials - this is very far from all at 12 o’clock territory - so be aware of those limitations.
I started this feature back in January, and it’s taken me this long to get a full grasp on everything the pedal has to offer in its current configuration. I feel it’s critical to have certain starting points for each effect / patch - and that’s really what my Preferred Settings are for. I watched all the videos and set the pedals both from those approximate values, as well as starting at carte blanche, everything at min / max values and from 12 o’clock - and then tuning to taste. All of this took a mighty long time, moreover I was trying to see how easily reproducible my favourite settings were - but as mentioned, a number of those need to be fine-tuned by ear. So you need a quite a lot of time and some significant patience to get the best out of this pedal - but if you do prevail and give it a proper go, you will discover some delightful highly usable and musical tones.
This is a relatively brief record of many weeks’ journey into sound, I hope you will find this overview/guide instructive and constructive whomever you might be.
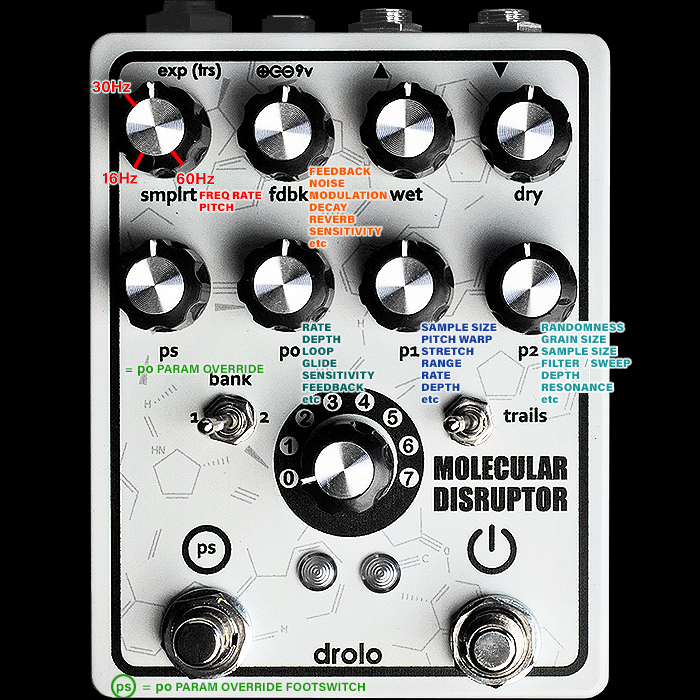
Let’s start with the Controls:
- smplrt : The Sample Rate or frequency operating range of the sampler. For this pedal the range is 16Hz at the minimum setting and 60Hz at max. The optimal setting is around 30Hz or circa 10:30 o’clock - while if you move the dial to the extremes you get a very slight sample degradation/reduction or rather gentle bit crushing effect or simply just a pitch change. The ’Change Pitch’ nature of the dial is used for instance on the ’Hold Aliaser’ and ’Tape Loop’ patches.
- fdbk : Is your classic ’Feedback’ control which is common to most types of delay (number of repeats etc.). This setting is also occasionally used for alternative functions including Decay, Envelope Sensitivity, Reverb, FM Modulation and Send Dry Signal to Aliaser.
- wet : Is simply the volume of your affected signal
- dry : Is the volume of you original unaffected signal
- PS : Is a secondary override value for the PS Footswitch - which overrides whatever is set for the P0 dial - in effect it takes over from the PO setting or gives you two alternative sounds to select from as such
- P0 : Is your main parameter dial - which you can use the PS Dial/Footswitch to flip between a secondary value for that parameter. This dial covers a variety of parameters including most obviously Rate, and then Depth, Loop, Sensitivity, Feedback, Pitch, Glissando/Glide, Drone Frequency and Reverb
- P1 : Is you secondary parameter control, also at times used for Rate, Sample Size, Pitch Shift/Warp, Filter Range, Stretch, Drone Frequency, Aliasing and Tape Speed
- P2 : Is your tertiary parameter control - used for Randomness, Filter, Octave Blend, Pitch Depth, Filter Resonance, Grain Size, Filter Sweep, Drone Mix, Delay Time, Sample Size, Vibrato and Tape Length
- bank 1 | 2 : Lets you select between your two banks/modules of 8 patches
- 0-7 main dial : Is where you select which of the 8 patches per that bank you want to use - note that if like me you have Drones as your first patch on Bank 2 - you are best selecting the 0 on bank 1 before you flip that toggle across (actually just turn Wet dial to 0, that works fine too). When you switch between banks you often need to ’toggle’ this dial back and forth to select the correct patch - with the exception of Drones on bank 2, Patch 1 as mentioned (0 on the dial) - strange why the dial is not marked up 1-8? Possibly this refers to the nature of the digital structure of the patches
- trails off | on : switch on trails (to the right) so that the tail of the effect is heard after you hit the ByPass footswitch - NOTE that when the pedal is not in use - you need to make sure this dial is set to OFF - otherwise it can interfere with your signal chain
- PS Footswitch : This activates a secondary value agains the main P0 parameter - hold for 0.3 seconds or more for momentary action, quick press results in latching action
- On/ByPass Footswitch : Another combined Momentary / Latching action Footswitch - note that the sample is pretty much perpetually on and hitting the switch just applies the playback really
- Expression Jack Socket : 1/4" TRS Jack Socket for Expresson Pedal
- Power Supply : 9VDC 100mA Centre Negative Boss style lead
- Audio In/Out : Standard 1/4" Jack Sockets
Usage Notes
As mentioned above, this pedal is an always-on Granular Synthesis Micro-Sampler/Looper - recording input for manipulation and playback even when bypassed. When the pedal is not in use I make sure the Trails switch is off, and that both Wet and Dry dials are set to Off, or else this pedal can interfere with your signal chain. It’s mostly advisable to turn down the Wet dial before changing patches - as output/noise etc can vary enormously between patches - and depending on how the dials are set. There are no two patches that I recall that use exactly the same settings - and there is no 12 o’clock magic sweetspot here for each of those dials - so you pretty much need to dial all of them in again every time you change patch - making fine-tunings by ear in several instances.
Patch Selection
When you acquire this pedal - the first exercise you need to go through is 'Patch Selection' i.e. choose which effects you want in each of your 2 Modules / Banks and in which order.
There are 33 effects patches available across 6 categories as follows:
DELAYS
- Stretcholay
- Reversolay
- Verbolay Filter
- Verbolay Pitch
- Chopolay
- Ringolay
- Pitcholay
- Aliaserolay
- Analog(-ey) Mod Delay
- Square Pitcher
LOOPY, SAMPLY, FREEZY STUFF
- Hold Aliaser
- Tape Loop
- Enveloop Vibrato
- Enveloop Reverb
GLITCHY, NOISY, RANDOM STUFF
- Glitcholay
- Pitch-Glitcholay
- Pitch Step Glider
- Pitch Square LFO
MODULATION
- Flanger
- Flanger Barberpole TZF Ring
- Granpa's Vinyl
- Dynamic Ringulator
- Dynamic Vibrato
- Dynamic Phaser
FILTERS
- Envelope Filter and Optional Bit Crusher
- Envelope Filter Aliased
- Envelope Filter Ring Modulated
- LFO Filter
- Step Filter
- Step Filter Bit Crushed
OTHER
- Drones
- Hounds Synth
- Tannhauser Gate
I chose the following (below) - I'm generally pretty happy with my selection, but there are probably a couple I overlooked on the first few sweeps - including the Chopolay, and a couple here I would ditch. My main focus was to get as many proper Glitch Effects as possible, so I ignored some of the more obvious Modulations, Delays and Filters. Owners of this latest version of Molecular Disruptor the V3, in fact versions V2.4 onwards can buy additional modules of 8 patches for €30 - which is something I will probably do once I've fully got to grips with the 16 patches I already have:
Anything with '..olay' in the name is obviously some form of delay.
- Glitcholay
- Granpa's Vinyl (lo-fi crackles)
- Pitch-Glitcholay
- Pitch Square LFO
- Pitch Step Glider
- Step Filter Bit Crushed
- Stretcholay
- Tannhauser Gate (Bitcrusher/Pitch-Shifter/
Filter/Reverb)
MODULE / BANK 2
- Drones
- Enveloop Vibrato
- Reversolay
- Envelope Filter Ring Modulated
- Hold Aliaser
- Hounds Synth
- Particolay
- Tape Loop
Two Modules come loaded into the pedal, and you can switch them out with further Modules (only 2 Banks concurrently). I will need to start thinking what my 3rd Module should be comprised of!
BANK 1
1.0 : Glitcholay (Randomized Glitching Delay)
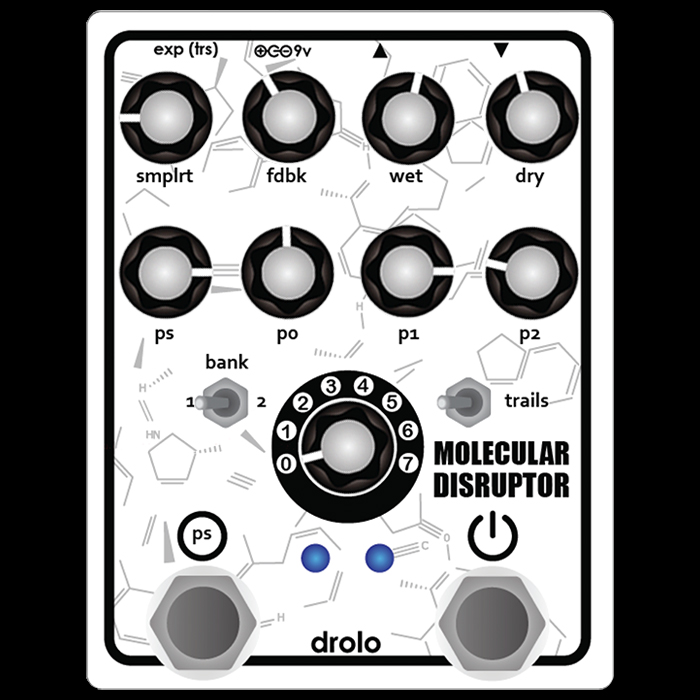
P0 = Rate | P1 = Sample Size | P2 = Randomness | fdbk = Feedback
- P0: Controls how often the signal will begin to loop
- P1: Defines the length of the samples being looped
- P2: Will gradually introduce randomness to the rate and sample size as you turn CW
Preferred Settings:
- smplrt : 9 o'clock
- fdbk : 11 o'clock
- wet : 12:30 o'clock
- dry : 11:30 o'clock
- PS : 3 o'clock
- P0 : 12 o'clock
- P1 : 3 o'clock
- P2 : 9:30 o'clock
- Trails : Off
NOTES:
This is that classic glitchy granular delay sort of thing and is really an 'adjust to taste' type effect depending on how glitchy you want things to get - the key dials here are P1 and P2 really. I've dialled in a moderate amount of glitch with medium and high settings for loop refresh rate. I would advise against using Trails here as they have a propensity to fully glitch out and go into infinite feedback - this can be problematic on feedback type effects - particularly those with pitch elements - which is not the case here, but the Trails are still best kept off. Dialling in the right amount of glitch here can be somewhat delicate, yet too little is never quite enough!
1.1 : Granpa's Vinyl (Lo-fi Crackles)
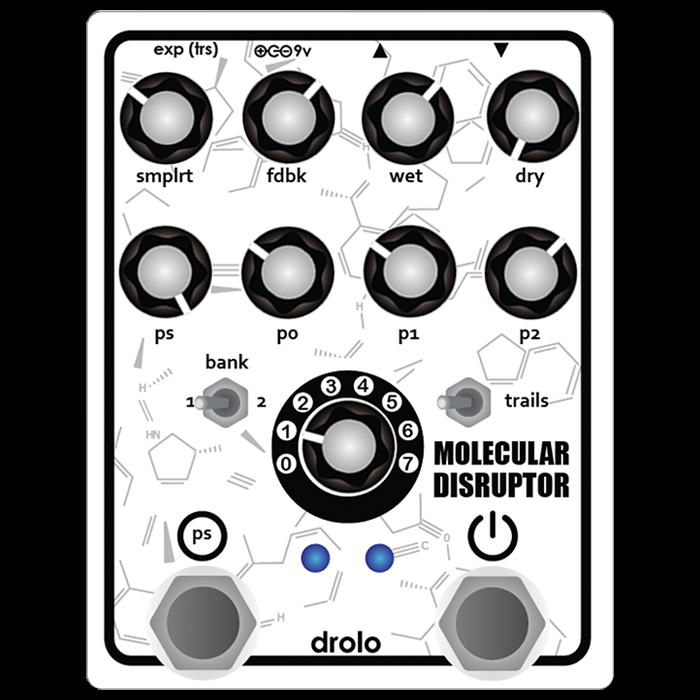
P0 = Rate | P1 = Pitch Warp | P2 = Filter | fdbk = Noise and Crackle
Preferred Settings:
- smplrt : 10 o'clock
- fdbk : 2 o'clock
- wet : 2 o'clock
- dry : Off / 0
- PS : Max
- P0 : 10 o'clock
- P1 : 10 o'clock
- P2 : 2 o'clock
- Trails : Off
NOTES:
I've dialled in a medium amount of Noise, Warp and Frequency reduction here - against two different rates for different levels of impact. This is something like a detune chorus in some ways with added hiss. The Strymon Mobius does a similar thing but slightly better in my opinion (Vinyl setting on Destroyer mode), and I would probably like a few more 'crackles' here, as the effect is relatively subtle on the noise-artefacts-front. I would suggesting pairing this with a lo-fi style reverb for further signal degradation effect.
1.2 : Pitch-Glitcholay (Randomized Glitching Delay with Pitch Shifting)
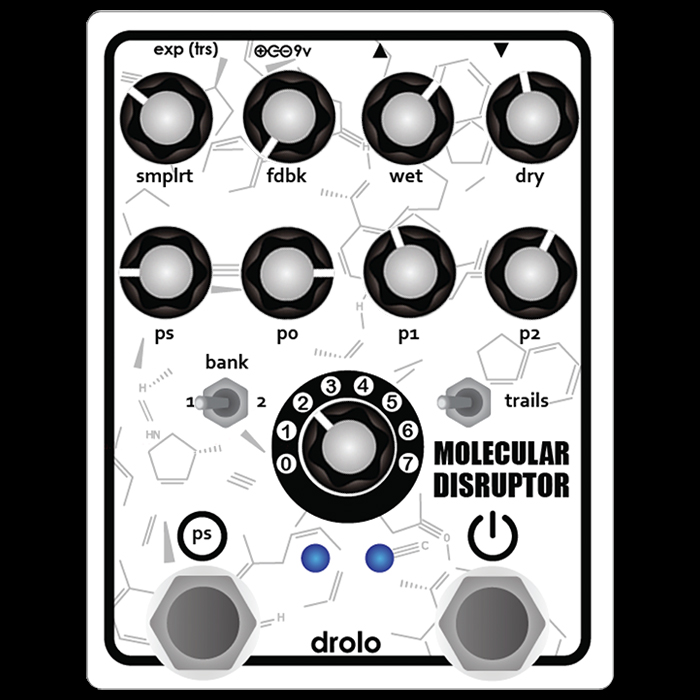
P0 = Feedback | P1 = Rate | P2 = Octave Blend | fdbk = N/A
- PS: have a significant degree of difference between PS and P0 dial settings for extreme ramp-up in glitchiness
- P0: feeds the signal back into itself in random bursts
- P1: defines how often the sample size changes
- P2: adds an octave up to the feedback
Preferred Settings:
- smplrt : 10 o'clock
- fdbk : Off / 0
- wet : 2 o'clock
- dry : 11:30 o'clock
- PS : 9 o'clock
- P0 : 3 o'clock
- P1 : 11 o'clock
- P2 : 1 o'clock
- Trails : Off
NOTES :
This is likely one of my favourite effects on this pedal - you get a lovely twittery/chirpy shimmery type of delay here. I set the PS and P0 dials in such a way that you can alternate between moderate and subtle intensity. You could pair this with a shimmer reverb for even more full-on effect - but it sounds lush still without it.
1.3 : Pitch Square LFO (Pitch Shifter Modulated by Square Wave)
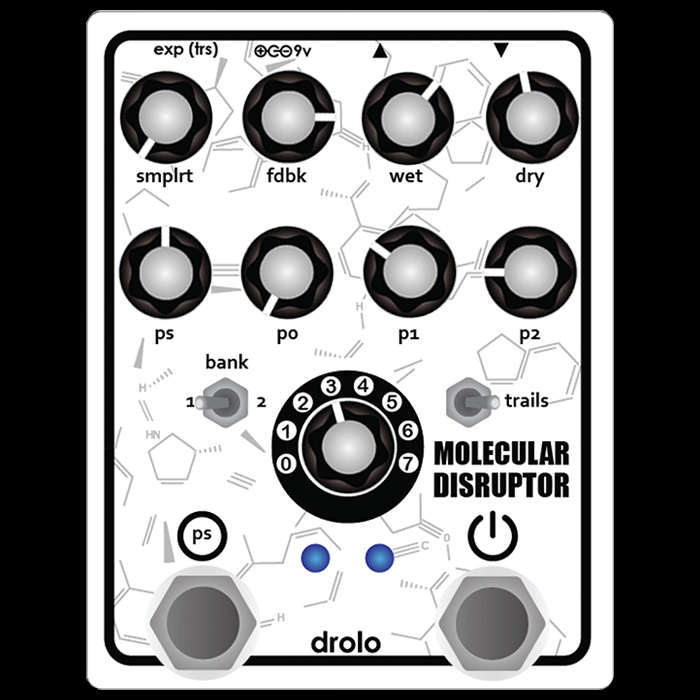
P0 = Pitch Depth | P1 = Rate | P2 = Randomness | fdbk = Feedback
Preferred Settings:
- smplrt : Off / 16Hz
- fdbk : 3 o'clock
- wet : 2 o'clock
- dry : 11:30 o'clock
- PS : 12 o'clock
- P0 : Off / 0
- P1 : 10 o'clock
- P2 : 9 o'clock
- Trails : On
NOTES :
The way I've set it up is that the default P0 is very much like an elegant shimmery effect, while with the Pitch Depth raised on the PS setting / footswitch it expands to a wobbly chorus-like shimmer - which is fun to apply momentarily but can induce sea-sickness longer-term!
1.4 : Pitch Step Glider (Sample & Hold Modulated Pitch Shifter with Glissando)
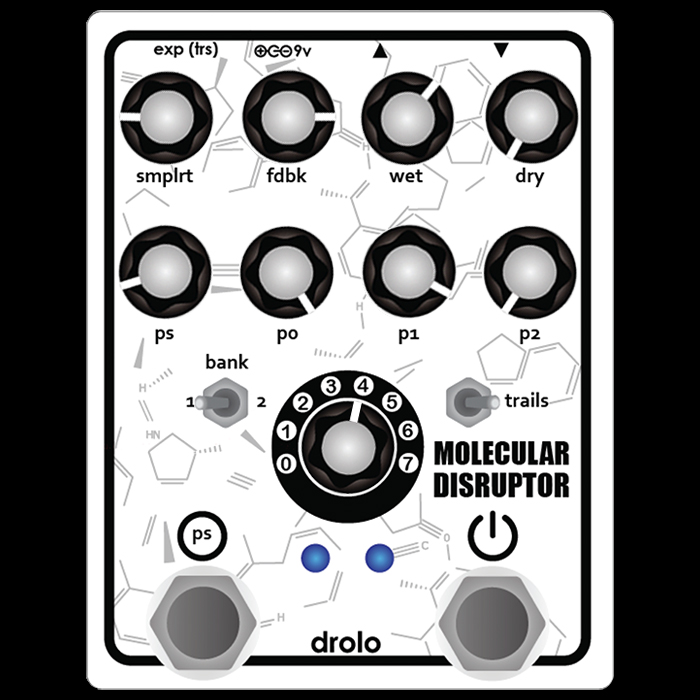
P0 = Glide | P1 = Rate | P2 = Pitch Depth | fdbk = Feedback
- P0 / Glide : CCW will be clean random steps, as you turn CW the transitions from one step to the other will gradually glide more, until no more steps are audible but a wobbly random LFO
Preferred Settings:
- smplrt : 9 o'clock
- fdbk : 3 o'clock
- wet : 2 o'clock
- dry : Off / 0
- PS : 8:30 o'clock
- P0 : Max
- P1 : 4 o'clock
- P2 : 7:30 o'clock
- Trails : On/Off
NOTES :
I set this as a sort of detune-style chorus with quite subtle waviness - and the default setting slightly more pronounced than on the PS override. You also get a sort of radiator ping slapback delay at the start depending on your string attack. The key setting here is the pitch depth or P2 dial - which I have as barely on - roughly 7:30 o'clock - or just off the baseline - you can hear when the sweetspot hits - it's so easy to make this effect jarring and unmusical, while I feel I've got the balance just right here and it did take a while to dial in. The same actually goes for my PS override - where the dial is circa 8:30 o'clock - again just tweak by ear for it to hit that very slightly swirly tone.
1.5 : Step Filter Bit Crushed (Vocal sounding Sample & Hold)
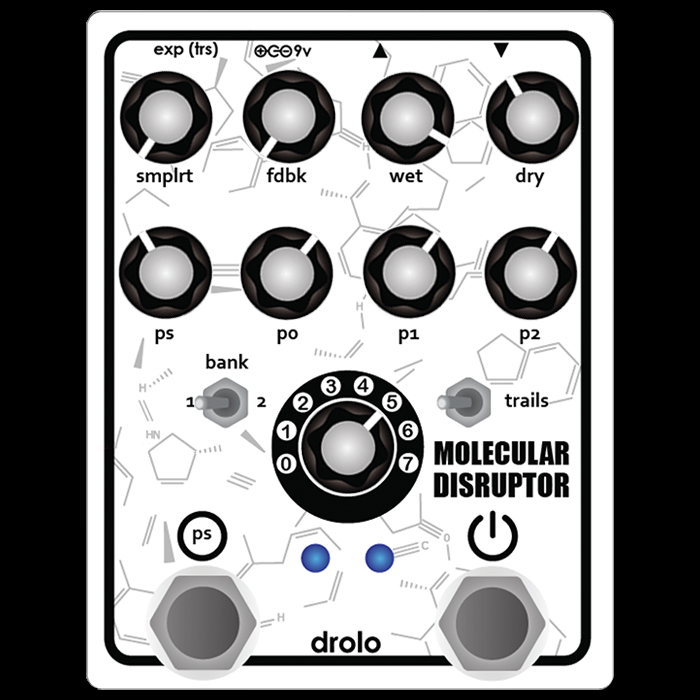
P0 = Rate | P1 = Filter Range | P2 = Filter Resonance | fdbk = Envelope Sensitivity
- P1 / Filter Range : CCW is a low pass. CW is a high pass. In the middle when you mix both together you get some more vocal sounds
- fdbk / Envelope Sensitivity : allows to envelope control the rate
Preferred Settings:
- smplrt : Off / 16Hz
- fdbk : Off / 0
- wet : 4 o'clock
- dry : 11 o'clock
- PS : 11 o'clock
- P0 : 2 o'clock
- P1 : 2 o'clock
- P2 : 2 o'clock
- Trails : Off
NOTES :
I've set this one up to sound slightly industrial/metallic - with a hint of gated fuzz here and quick glitchy cut-off / no sustain. My default setting is at the full Rate so you hear a rapid progression of pitch steps, wile the PS override slows it down considerably for a more glitchy effect. This one can be a rather tricky one to dial in and the interplay and intervals on many of the dials here can be fairly tight and sensitive. The settings as I have them here afford the best balance of effect - which sounds optimal to me on the lowest Sample Rate. The difference in rates may seem slight but is just the right degree to go from relatively subtle to moderate.
1.6 : Stretcholay (Delay whose repeats get reversed and time stretched)
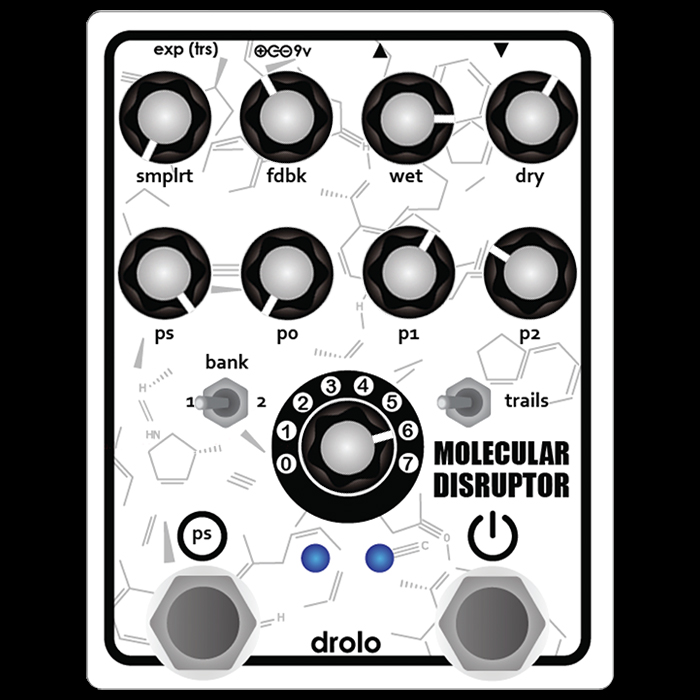
P0 = Loop | P1 = Stretch | P2 = Grain Size | fdbk = Feedback
- P0: from CCW to CW it defines how much of your audio is being recorded and how much is looped. At full CW it will stop recording and only loop. The loop degrades after some time
- P1: CCW no stretching -> noon max stretching - > CW stretched grains begin to be rearranged in reverse order
- P2: defines the size of grains that are used to stretch tha sample, from CCW with larger grains and gentle slopes to CW with shorter grains and choppy slopes
Preferred Settings:
- smplrt : Off / 0
- fdbk : 11 o'clock
- wet : 3 o'clock
- dry : 1:30 o'clock
- PS : Max
- P0 : Off / 0
- P1 : 1:30 o'clock
- P2 : 10 o'clock
- Trails : Off
NOTES :
The settings above give you that perfect chirrupy twittery stuttery delay - and the key dials here are P1 and P2 where the interplay of the two is critical. I've set the PS and P0 at the two extremes which works really well here in this context - while typically smaller intervals are preferable. The default mode is actually more pronounced, while the override PS extends the loop infinitely and you get a sort of slight drone undertone and less pronounced and diverse effects - so slightly more subtle in most ways. For the default you can have quite significant jumps in the volume between patches of stutters and chirrups, while on the override setting these levels are far more consistent - so be careful too how you set you Wet dial.
1.7 : Tannhauser Gate (Bitcrusher/Pitch-Shifter/Filter/Reverb - Vangelis Blade Runner Style Reverb)
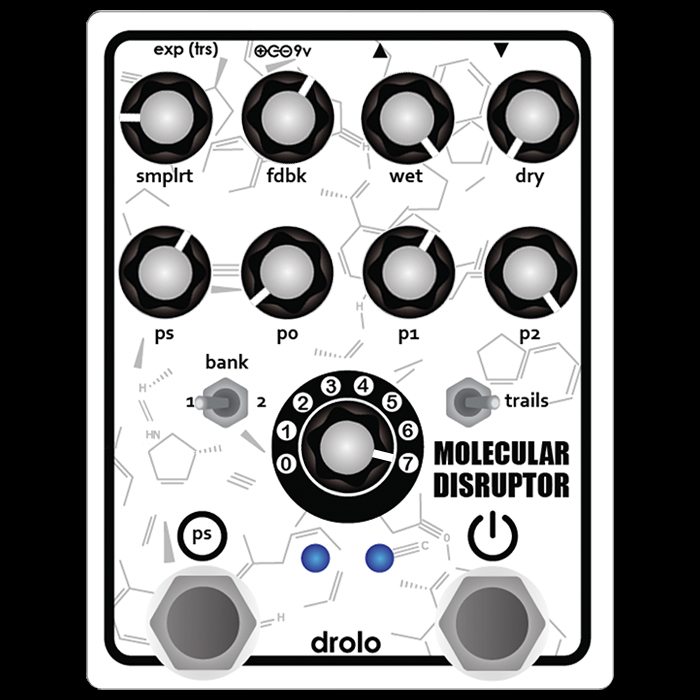
P0 = Amount of Pitch-Shift | P1 = Filter/Pitch Control | P2 = Filter Sweep | fdbk = Reverb
- This patch was made with expression pedal use in mind
- P1 (exp) : controls pitch and filter simultaneously
- P0 : defines how much P1 controls the pitch (0 to -1 Oct)
- P2 : controls how much P1 affects the filter
Preferred Settings:
- smplrt : 9 o'clock
- fdbk : 1:30 o'clock
- wet : Max
- dry : Off / 0
- PS : 12:30 o'clock
- P0 : 8 o'clock
- P1 : 1:30 o'clock
- P2 : 4 o'clock
- Trails : On
NOTES :
I took several attempts at this before getting my ideal parameters right - I add a long-ish stereo delay and stereo shimmer reverb downstream as well for even more atmosphere. There are several settings that work here, while the settings in the demo video above don't make to much sense - particularly the lack of wet - which I have at nearly full whack on mine. This is definitely one for us Bladerunner fans and bizarrely one of the effects that I come back to the most often - even though I can relatively easily recreate with other pedals I already have.
BANK 2
2.0 : Drones (2 Individual Oscillator Drones)
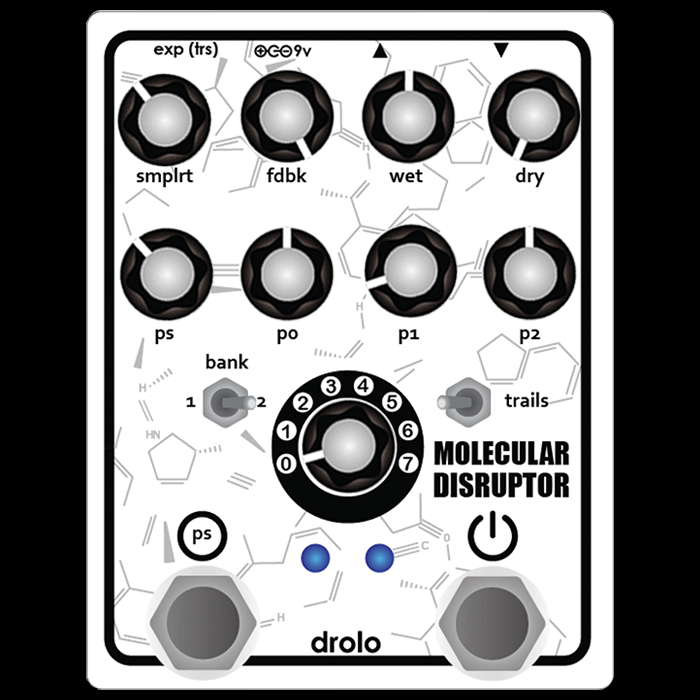
P0 = Drone 1 Freq | P1 = Drone 2 Freq | P2 = Drone 1+2 Mix | fdbk = FM Modulation
- fdbk: When you turn up the FM modulation (fdbk) the frequency of Drone 2 will be used to FM modulate Drone 1
Preferred Settings:
- smplrt : 10:30 o'clock
- fdbk : Max
- wet : 12 o'clock
- dry : Off / 0
- PS : 10:30 o'clock
- P0 : 12 o'clock
- P1 : 8:30 o'clock
- P2 : 12 o'clock
- Trails : Off
NOTES :
This one is an odd one really - not properly an effect at all, but a sound-generator or noise-maker. The interplay of 4 dials in particular is critical - P0, P1, smplrt and fdbk - and for me the interesting parts are the cross-over frequency bits. I spent forever trying to get a cool 70's sci-fi phaser gun sound - and ended up with the above settings. Not sure about the utility on this one - you can spend hours tweaking the knobs here to tiny degrees, it's really just a stand-alone type of sound - useful for studio work possibly - the lack of presets on the pedal makes it impossible to set different settings easily as so many of these require tweaking by ear to hit the perfect sweetspot. I kind of like the sound of this in small doses - it can get annoying on prolonged exposure though and has very limited use.
2.1 : Enveloop Vibrato (Endless Repeating Delay Loops Run Through Vibrato)
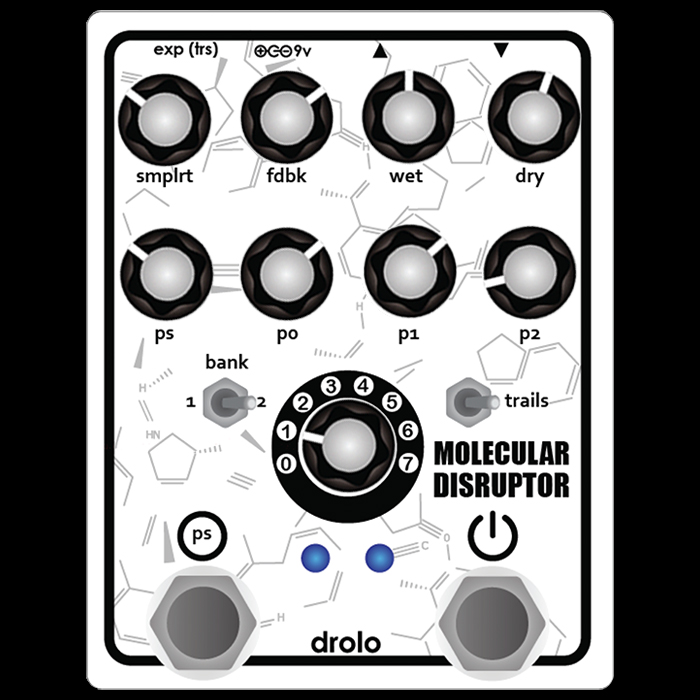
P0 = Sensitivity | P1 = Vibrato Rate | P2 = Delay Time | fdbk = Decay
P0 / Sensitivity : determines how much signal is added into the loop and fades a portion of the previous loop out. When set to minimum the signal is looped infinitely. You can use the PS function switch to control this
P1 / Vibrato Rate: applies vibrato to the looped samples
P2 / Delay Time : defines the length of the looped sample. On very short setttings, the loop will fade out faster
fdbk / Decay: fully CW the samples can loop infinitely (well almost). As you dial it back the loop will start to fade out
Preferred Settings:
- smplrt : 10 o'clock
- fdbk : 2 o'clock
- wet : 12 o'clock
- dry : 1 o'clock
- PS : 10 o'clock
- P0 : 2o'clock
- P1 : 2o'clock
- P2 : 8:30 o'clock
- Trails : On
NOTES :
The setting I have come up with I'm naming 'Spooky Trails' as it has an eerie ghostly quality to its warble. I've set the P0 for a moderate impact effect and the PS override somewhat more subtle. It's at a level where it's quite musical - and has that haunting lilt to it - would probably be a good mood-generator for a campfire ghost story or movie even. P0, P1 and P2 dials are all important here, and you need to get the mix between those 3 right which is not too difficult for this effect. There's lots of scope for the 'warble' here but you need to be wary of nauseous-inducing levels if pushed too much. No doubt a rather specialist effect that can be reduced to just a hint of chorus really - so there is quite a wide palette of useful tones here.
2.2 : Reversolay (Reverse repeats that can be pitch shifted up to 3 octaves)
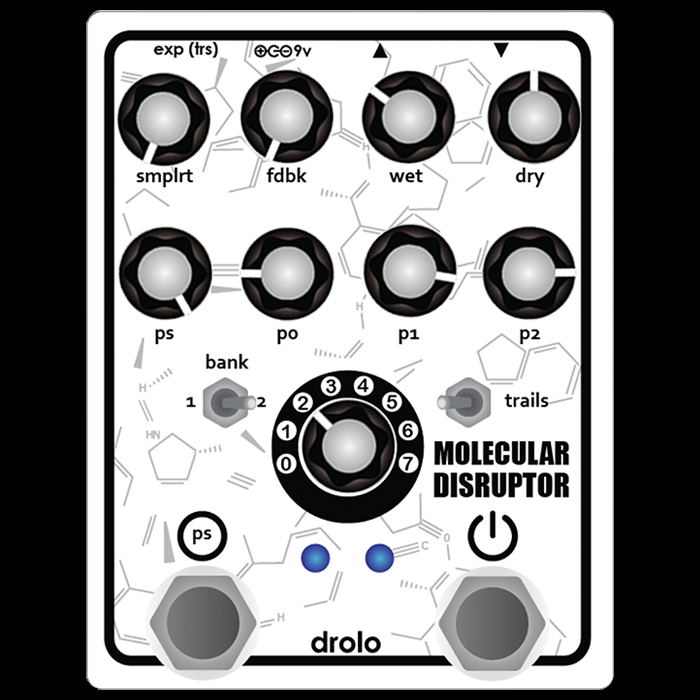
P0 = Loop | P1 = Pitch | P2 = Sample Size | fdbk = Feedback
- P0: below noon you are recording and playing, above noon it will loop the last sample and stop recording
- P1: pitch intervals : unison, +5 semitones, +7 semitones, +1 oct, +1 oct and 5 semitones, +1 oct and 7 semitones, +2 oct, +3 oct
Preferred Settings:
- smplrt : Off / 16Hz
- fdbk : Off / 0
- wet : 10 o'clock
- dry : 12 o'clock
- PS : Max
- P0 : 9 o'clock
- P1 : 3:30 o'clock
- P2 : 3 o'clock
- Trails : Off
NOTES :
I will name my above Setting 'The Twinkle Burst' as a sort of pitched up shimmery burst of delay. This is just a classic simple pitched reverse delay - where the key dials are P1 and P2. You need to adjust both by ear and feel really. I got the right harmonic content at around 3:30 on the P1, and around 3 o'c on the P2 - you need merely adjust to taste. ON the PS versus P0 setting - the first is a sort of infinite override - which just holds the P0 delay as such. There are lots of possible permutations here - and I just ended up on my preferred version as it sounded really cool to me - I was tinkering with a lower octave alternative for a while, but decided I liked this more high pitched alternative in the end.
2.3 : Envelope Filter Ring Modulated (Vocal Sounding Filtered Ring Mod)
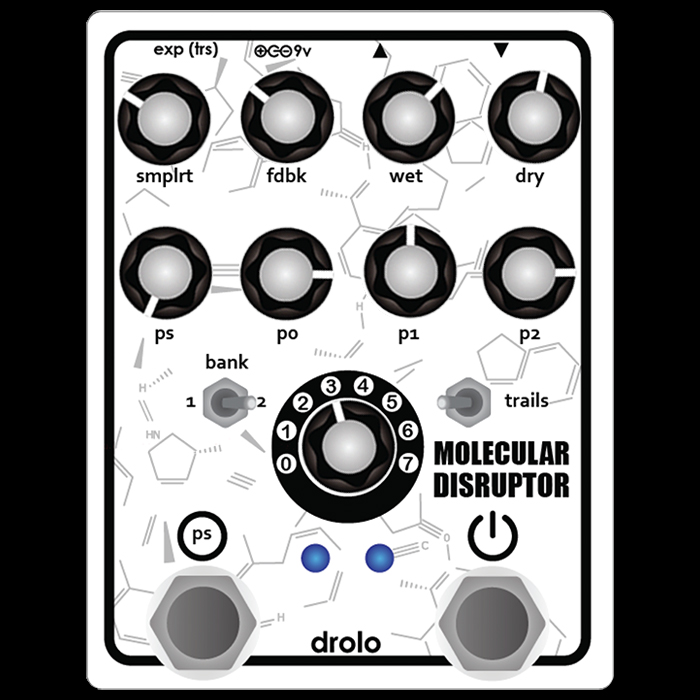
P0 = Ring Mod Rate | P1 = Filter Range | P2 = Filter Resonance | fdbk = Envelope Sensitivity
- P1 / Filter Range : CCW is a low pass. CW is a high pass. In the middle when you mix both together you get some more vocal sounds
- fdbk / Envelope Sensitivity : controls the filter frequency but also the ring mod rate
Preferred Settings:
- smplrt : 10 o'clock
- fdbk : 10:30 o'clock
- wet : 2 o'clock
- dry : 12:30 o'clock
- PS : Off / 0
- P0 : 3 o'clock
- P1 : 12 o'clock
- P2 : 3 o'clock
- Trails : On/Off
NOTES :
For a seemingly simple effect this one took me a considerable while to dial in correctly - to get the right blend of musical harmonics. Most of the hard work is in the interplay of the smplrt and fdbk dials, but P1 and P0 are also significant - as is the balance between dry and wet. On my journeys through the sweeps of the dials I was getting everything from Donald Duck style quacks to otherworldly kazoos and didgeridoos and 'yeah yeah yeahs' and 'yoi yoi yois'. It's so easy to dial in a cool sound, but which likely does not track musically. Getting the best mix of sort of vocal formant noises with the right degree of ring modulation harmonics took me a really long time - and requires tiny movements of three or four dials at the same time. It's tricky to replicate the favourite settings - so you need to start in the ballpark and then tune it by ear! This sort of thing makes me think that these Granular Synthesis pedals desperately need numerical screens and presets to become widely accessible and acceptable.
2. 4 : Hold Aliaser (Near Infinite Freeze/Hold with Aliasing)
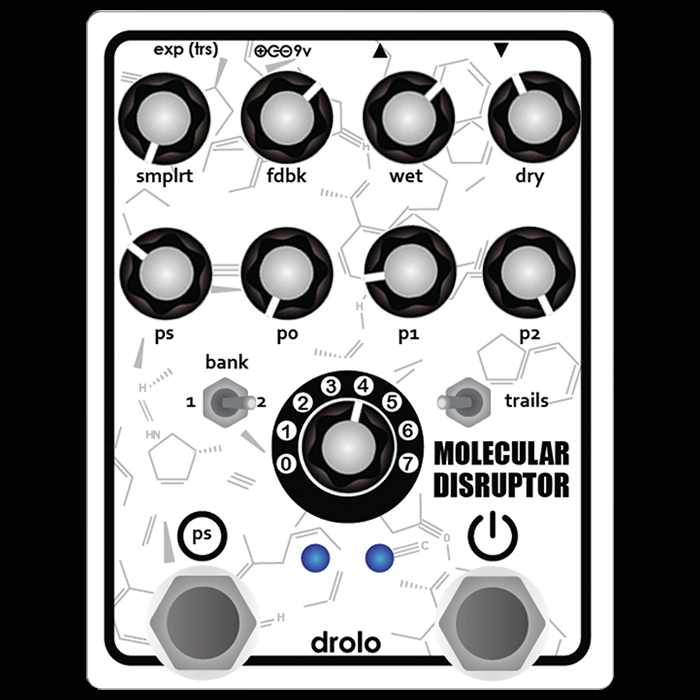
P0 = Reverb Size / Hold | P1 = Aliaser | P2 = Filter | fdbk = Send Dry to Aliaser | smplrt = Change Pitch
- P0: up to noon it sets the reverb size and level at max it will hold the current layer of sound
Preferred Settings:
- smplrt : Off / 16Hz
- fdbk : 2 o'clock
- wet : 2 o'clock
- dry : 11 o'clock
- PS : 10 o'clock
- P0 : Off / 0
- P1 : 8:45 o'clock
- P2 : Max
- Trails : Off
NOTES :
This relatively simple effect - a combination of Aliasing / Ring Modulation and Envelope Filtering actually has quite a lot of different tones onboard including some really cool buzzy lo-fi ones. My preferred settings I like to define as a buzzy vibrato ring modulation - a combination of clang and static buzz with a touch of warble to it - particularly on the sustaining PS override setting. The main dial for me here is the P1 one, and you need to tune quite finely by ear to hit each sweetspot.
2.5 : Hounds Synth (Kate Bush Running Up That Hill Synth Tone)
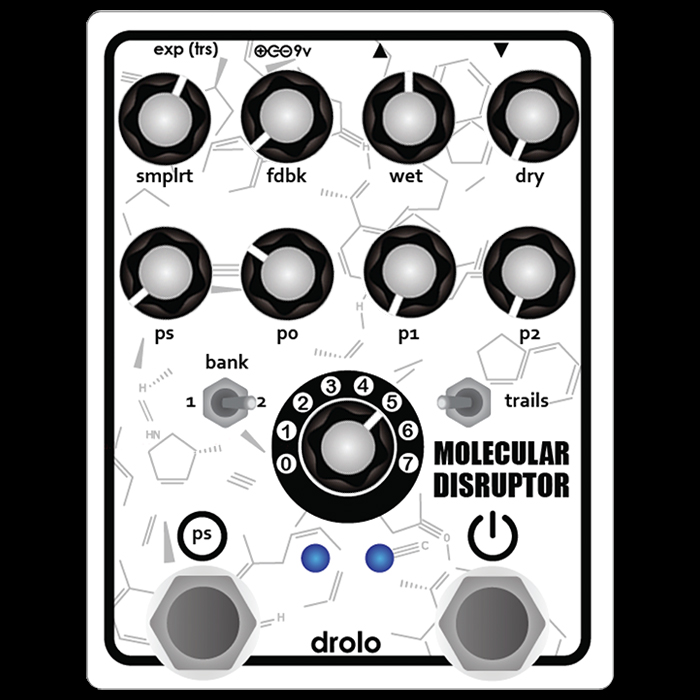
P0 = Glissando Duration | P1 = Filter | P2 = Vibrato | fdbk = Envelope Sensitivity
- fdbk / Envelope Sensitivity : defines how well the audio input triggers the envelope follower that controls the pitch glissando and filter sweep
Preferred Settings:
- smplrt : 1:30 o'clock
- fdbk : 8 o'clock
- wet : 12 o'clock
- dry : Off / 0
- PS : 8 o'clock
- P0 : 10 o'clock
- P1 : Off / 0
- P2 : Off / 0
- Trails : Off
NOTES :
This is a relatively simple Glissando Synth style effect that is still quite tricky to dial in - and it took several tries to get something fully replicable and consistent. There really is just one group of settings, and the P1 and P2 are actually surplus to requirements for that Kate Bush synth sound. David included Envelope Filter (P1) and Vibrato (P2) to make this effect more interesting, but neither does anything to improve the core tone. I found that the ideal sensitivity setting was around 8 o'c on the fdbk dial, and the P0 glissando setting is highly sensitive with the sweetspot around 10 o'c - you just need to tweak by ear really - once you get The Tone though you recognise it immediately. I actually really just like it on its own - but I guess it has limited practical use overall.
2.6 : Particolay (Granular Delay with Feedback)
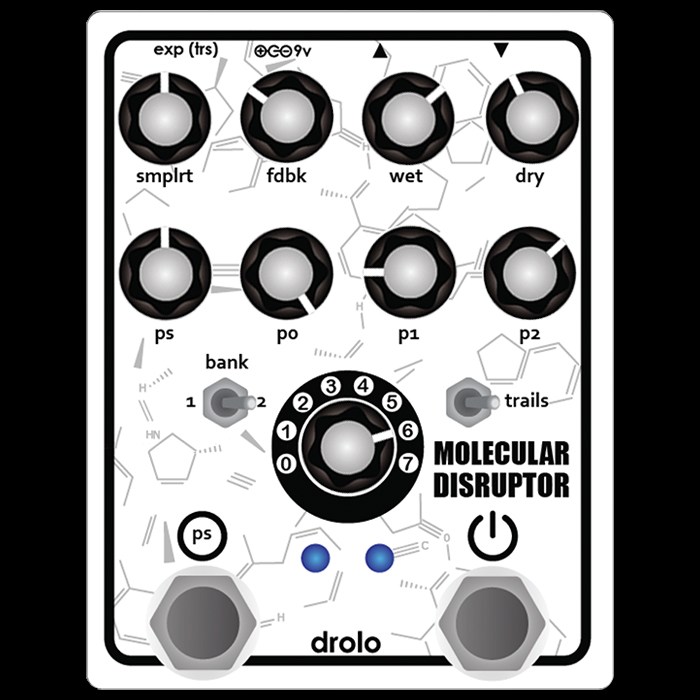
P0 = Envelope Sensitivity | P1 = Particle Rate | P2 = Delay | fdbk = Feedback
- P0 : When you increase envelope sensitivity, the harder you play the more the rate is going to slow down
Preferred Settings:
- smplrt : 12 o'clock
- fdbk : 10 o'clock
- wet : 2 o'clock
- dry : 11 o'clock
- PS : 12 o'clock
- P0 : Max
- P1 : 9 o'clock
- P2 : 2 o'clock
- Trails : On
NOTES :
This is quite an intriguing delay which I'm going to describe as a rubber ball bounce delay as the intervals between echoes get progressively shorter - so the tail of the echo kind of peters out as a trill. The way this delay works is that the harder you play the slower the delay, while it then increasingly speeds up to a trill - which is a little bit like a bouncing ball or spinning coin - where the final bounces / oscillations are shorter and therefore quicker. My default is to have the Envelope Sensitivity at max, and then you get a slightly subtler effect by dialling the PS override back to 12 o'c.
2.7 : Tape Loop (Tape Loop, Stretch and Chop)
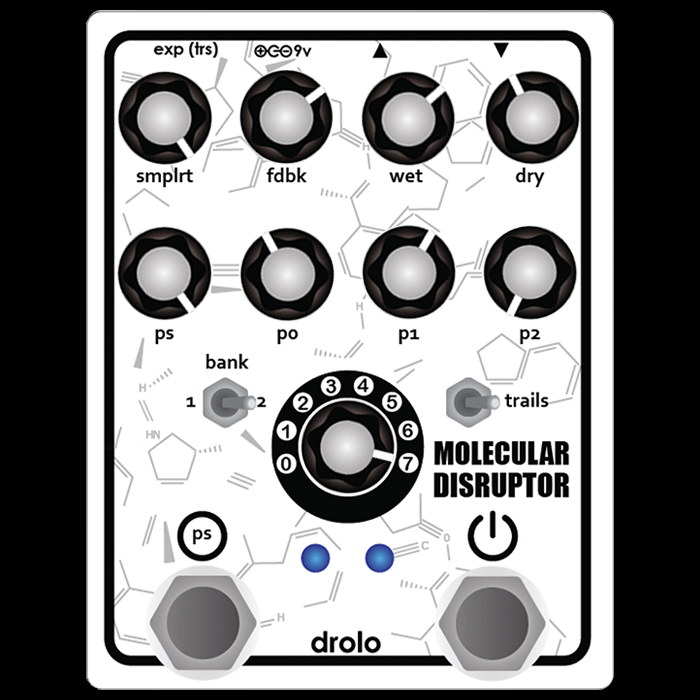
P0 = Loop | P1 = Tape Speed | P2 = Tape Length | fdbk = Feedback | smplrt = Change Pitch
- P0 : below noon you are recording and playing, above noon it will loop the last sample and stop recording
- P2 : reducing it to the smallest settings can create glitchy artifacts, flanger-like sounds and other weird stuff, is interactive with tape speed. Note: when pot1 is at noon, pot2 has little to no effect.
Preferred Settings:
- smplrt : Max
- fdbk : 2 o'clock
- wet : 2 o'clock
- dry : 11 o'clock
- PS : Max
- P0 : 11 o'clock
- P1 : 1 o'clock
- P2 : Off for Clank Glitch, 9 o'clock for flange
- Trails : On*
NOTES :
In the above visual I have my favourite 'Clang' industrial setting - where you get tinny clanging echoes with static electric noise and glitches - with P2 on full-anti-clockwise. Move P2 to 9 o'clock and you get my second favourite setting - a sort of modulated flange delay. As the P0 advisory hints above, P0 below noon records and plays back - I then stomp on the PS override when I want a continuous playback loop of the last sounds recorded - based on P2 tape length. There really are tonnes of different flavours here - with the interplay between the P1 and P2 dials being the most impactful. * Note also that with Trails on you get signal interference in your signal chain - so switch it off when the effect is not in use.
Final Thoughts
So this is the first of the larger 'Glitch' style pedals I've deep-dived into. I'm no slouch when it comes to these more complex pedals having started on the Strymon Stryfecta (Mobius+TimeLine+BigSky) before adding the even more complex Boss MD-500 and RV-500 workstations and the Empress EchoSystem, and somewhat simpler Source Audio Ventris. The RV-500 in particular took a long time to fully figure out as there are so many different settings - and some very complex settings for footswitch modes and default functions which took me longer than expected to get my head around.
With the Molecular Disruptor the pedal is actually relatively straight-forward - the issue as it were is with all the different patches and their shared controls. If you compare methodologies say Strymon vs the Disruptor - let's say the Mobius to be in some sort of ballpark here - the Mobius has presets - and each of those has been finely tuned with high-pass and low-pass filters to give fantastic voicing straight out of the box. The Boss pedals are equally usable on start-up, but don't have quite as refined a palette by default - you need to adjust to taste, as Boss is more neutral and flat, while Strymon very much has it's own sort of slightly augmented or enhanced sound.
The Molecular Disruptor is the polar opposite to say the Mobius and MD-500 - there are no presets or defaults, and generally not that many settings to tweak per parameter relative to the other 2 workstation pedals. This means that with the Disruptor you need to dial everything from scratch every time and you mostly need to fine-tune by ear. Depending on the effect also there are different parts of each dials which are the best starting point - and rarely the middle or 12 o'clock position. Also in terms of replication - the Mobius and MD-500 and have precise numerical references down to the integer - where the Disruptor is adjusted by approximation, by feel and by ear.
That is not to say that the Molecular Disruptor is not a great pedal - the pedal itself is perfectly fine, and some of the algorithms / patches are truly great. The downside here is the degree of dialling in and fine-tuning that is required, and the inability to save and recall presets or easily replicate settings and successfully dial them in again and again.
Tom Majeski at Cooper FX has started the second phase of development really for these types of pedals with his Moment Machine Pitch-Shifting Workstation - which has a much-needed digital display, and comes with save-and-recall presets.
The Glitch pedal category is currently very much in its infancy, but since these are entirely digital pedals, there is no reason they should not have digital controls and presets with slightly easier tweakability courtesy of finely calibrated and shifted / focused controls and ranges - all of which can be easily tracked via precise on-screen variable integers.
I still really like the Disruptor, and it will remain in my chain for another couple of weeks at least before I do a similar exercise on the Pladask Elektrisk Fabrikat. I've also mentioned that I have designs on the new Tomkat Cloudy pedal - which only has a rather more comfortable 6 modes, yet no less than 11 dials - 6 large and 5 small alongside 2 further mode push-buttons. Possibly more dials could help with the complexity of the Disruptor - as remembering all the alternative functions of each dials is never going to happen - so more dedicated dials would probably help here.
So the Molecular Disruptor actually gets a firm thumbs up - with some provisos obviously - and I would probably not choose the Granpa's Vinyl or Drones patches the second time around. To be frank I've spent a little too much time with the Disruptor of late and we both probably need a break from each other! Once I get back to it I will be considering what I would want as a 3rd Module / bank of patches. I'm hoping David Rolo himself will read this, and be able to advise me some more on getting the very best out of his pedal.
Longer term though I see other brands getting in on the action, and the race is on to find a better display and interface for these types of pedals. Tom Majeski's Moment Machine is a step in the right direction, but I'm still not sure he's 100% hit upon the right formula of display, dials and footswitches yet. I personally feel that a 3-footswitch style workstation pedal - of the ilk of the Moment Machine, Strymon Stryfecta and Boss 500 series is likely the best future format for these kinds of devices. For those devices which are never going to have screens, we need to figure out a more elegant combination of controls and defaults to make the basics of deploying them less of a chore!


